Как написать php календарь на месяц и на год? JQuery календарь при заполнении даты в поле Input Css календарь на 3 месяца.
Выбор даты применяется на сайтах, торгующих авиа и железнодорожными билетами, ведь посетителя интересует заказ билета на определённый день. Календари также применяются в блогах, где записи систематизируются по дате, и сайтах, связанных с разными событиями, например, спортивными. Так или иначе, календарь востребован и может быть добавлен следующим образом.
На сервер данные передаются в формате ГГГГ-ММ-ДД, например, 22.12.2014, а вид календаря может различаться в зависимости от браузера. Полностью поддерживает календарь пока только Opera, выводя виджет для выбора любой даты (рис. 1).
Рис. 1. Календарь в браузере Opera
Браузер Chrome также поддерживает календарь, но делает это весьма скупо (рис. 2). По сути вы только можете прокручивать дату или вводить её как текст.
Рис. 2. Календарь в Chrome
В примере 1 показано создание календаря для выбора произвольной даты.
Пример 1. Календарь
HTML5
IE
Cr
Op
Sa
Fx
Календарь
Выберите дату:
Допустимо ограничить ввод даты заданным значением через атрибуты min
и max
, они соответственно указывают нижнюю и верхнюю дату. Так, если вам требуется сузить диапазон ввода до ±3 дней от даты 01.06.2012, то код запишется, как показано в примере 2.
Пример 2. Ограничение даты
HTML5
IE
Cr
Op
Sa
Fx
Календарь
Выберите дату:
Текущая дата заданная через атрибут value
подсвечивается фоном, неактивные дни, которые нельзя выбрать - серым цветом (рис. 3).
Рис. 3. Календарь с диапазоном ввода
Кроме традиционного календаря, в котором можно выбрать дату, месяц и год, существует и календарь только для ввода месяца и недели. Они записываются в таком виде.
Выбор месяца в Opera происходит через аналогичный виджет, но в этом случае нельзя указать конкретную дату (рис. 4).
Рис. 4. Выбор месяца в Opera
На сервер данные поля type="month"
пересылаются как ГГГГ-ММ, например, 2014-10.
Похожим образом выглядит и виджет для выбора недели (рис. 5), но дополнительно выводится номер недели и выбрать можно только её. На сервер при этом значение отправляется как 2014-W38, где вначале указывается год, затем через дефис W и после него номер недели от начала года.
Рис. 5. Выбор недели в Opera
В примере 3 показано создание поля для ввода месяца.
Пример 3. Выбор месяца
HTML5
IE
Cr
Op
Sa
Fx
Календарь
Укажите месяц:
Одним из важных элементов на сайте является календарь, с помощью которого ваши пользователи могут отслеживать события, появления новых продуктов. Или просто читать записи или еще что только не придумаешь. Уделив несколько времени этому уроку, вы узнаете, как создать PHP скрипт календаря для своего сайта. Мы не будем ограничиваться только программированием, также обратим внимание на css и html структуру календаря. Одним словом сделаем все, от начала до конца!
CSS
Меньше слов, больше дела. Сразу же начнем из css стилей календаря. Ниже предоставленный код, совместим с проблемным браузером IE6.
Весь PHP код скрипта календаря, в основном базируется на одной функции, которая требует два параметра: желаемый месяц и год. Следует отметить, в средине функции, я оставил место для к базе данных. Если хотите, можете выводить необходимые события в сетку календаря. При написании этого скрипта, я использовал таблицы, вместо div блоков, так как они более практичны в случае, если один день будет пресыщен событиями.
За основу брался англоязычный скрипт календаря, поэтому предоставлю две версии: календарь в английском и русском стиле. Выбирайте, какой вам по душе! Разница только в PHP коде. CSS стили остаются прежними, для обеих вариантов.
";
/* необходимые переменные дней и недель... */
$running_day = date("w",mktime(0,0,0,$month,1,$year));
$running_day = $running_day - 1;
$days_in_month = date("t",mktime(0,0,0,$month,1,$year));
$days_in_this_week = 1;
$day_counter = 0;
$dates_array = array();
/* первая строка календаря */
$calendar.= "
< $running_day; $x++):
$calendar.= "
1.2 Get Bootstrap
Bootstrap is a innovative and easy to use CSS framework that we will use mainly for its grid based structure.
In order to use it, just link the css and js files in the head section from their official links like below:
Calendar Component
2. Creating the Calendar
Below, you can see the step by step calendar creation. We will create the calendar first in html and then add the css.
2.1 HTML
The html section is going to include the following basic structure:
1. A wrapper – this tag will wrap all the elements inside the calendar
2. A header – it will contain the month title and left and right navigation icons
3. A calendar-body – it will contain the weekdays row and the date rows.
4. A current-date – it will be a section in the bottom of the calendar showing the actual date.
We will need 1 row for the weekdays and 5 rows for date rows. The structure will look like this:
Nothing shows in the browser yet. Now that we’ve created the rows, lets add the following components:
1. Navigation Icons – there is a class on bootstrap for these icons: glyphicon glyphicon-chevron-left/right
2. Add the month that the calendar is showing in the header section wrapped inside a p tag
3. Devide the rows into 7 columns with bootstrap’s class: col-xs-1 and add weekdays inside p tags
4. Use the same col-xs-1 to dates but wrap the paragraph inside anchor tags, they need to be clicked
With the code above added, our html now looks like this:
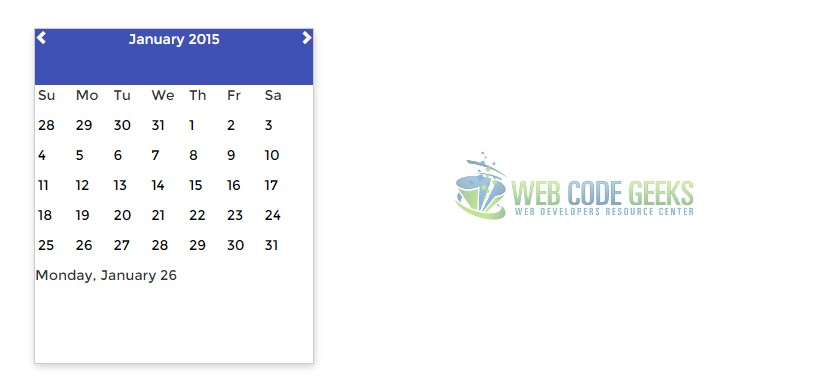
January 2015
Monday, January 26
Well, now we’ve got a view in the browser:
Don’t worry about the right nav icon going far, we’ll fix that with css. Also notice that I have added an inactive class to some dates.
That is beacuse those dates are not from the current month and need to be styled a bit different (i.e a lighter color than the rest).
2.2 CSS
Here comes the fun part, styling is what gives elements a shape and a overall look. Lets start with these universal attributes:
Body {
font-family: "Montserrat"; /* just a cutsom font */
}
a:-webkit-any-link{
text-decoration:none !important; /* do not underline links */
color: black; !important; /* give links a default color */
}
For the navicons to show right add pull-left and pull-right next the the other classes:
Now give the basic stucture elements some styling attributes:
Wrapper {
margin: 10em; /* just a temp margin */
border: 0.1em solid #ccc; /* wrap the calendar inside a box */
width: 20em; /* define a width for the box */
height: 24em; /* define a height for the box */
box-shadow: 0.1em 0.2em 0.8em #ccc; /* box shadow for better view */
}
.header {
height: 4em; /* define a height for the header */
background-color: #3f51b5; /* give the header a background color */
color: white; /* give the header a text color */
text-align: center; /* center the text inside the header */
}
.calendar-body .col-xs-1 {
width: 2.5em; /* give each column a fixed width */
margin-left: 0.2em; /* have some space between columnd */
text-align: center; /* align text in the center */
}
The view of our calendar became:
Styling – Part 1
Ok, next add attributes to individual elemtents to enhance thier look inside the calendar: .header p {
padding-top: 1.2em; /* vertical centering */
text-transform: uppercase; /* all caps text */
}
.header span {
padding: 1.3em; /* vertical and horizontal centering icons */
}
.inactive { /* inactive dates get a light gray text color */
color: #ccc;
}
.weekdays {
padding: 1em; /* giving weekdays some space around */
}
.dates {
padding: 0.2em 1em 0.2em 1em; /* giving dates some space */
}
.line { /* a gray line separator */
height: 0.1em;
border: 0.1em solid #EEEEEE;
}
.current-date { /* styling the current date section */
text-transform: uppercase;
text-align: center;
padding: 0.7em;
}
.calendar-body .row .col-xs-1 p:hover {
color: #4778a6; /* hover state on all dates */
}
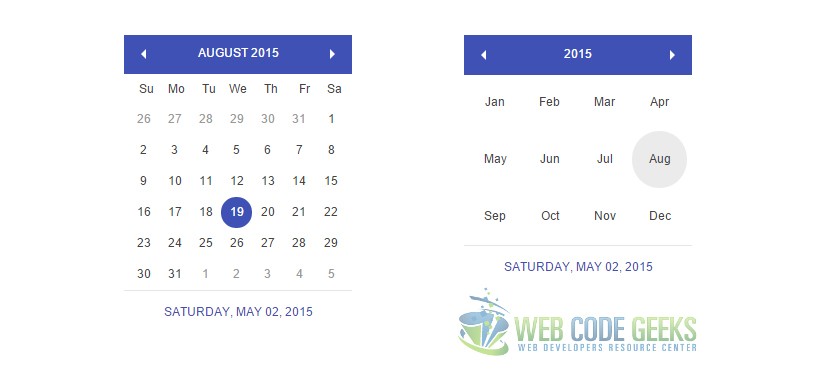
And we finally have a pretty styled and moder looking calendar. Look at this:
Simple as that, looks like we’re done. Before concluding this example lets see a pre-made calendar from http://demos.telerik.com/ where the calendar has full interactivity enabled by jQuery library.
3. Interactivity? Yes, with jQuery!
In this section, I intend to let you know calendars can and should be fully interactive with date/month/year choosing.
The example below is just for demonstration, it is a template on the internet that has interactive behaviour.
html { font-size: 12px; font-family: Arial, Helvetica, sans-serif; }
Kendo UI Example for WCG
$(document).ready(function() {
// create Calendar from div HTML element
$("#calendar").kendoCalendar();
});
Everything is in there, including html, css and js, but css and js are linked from the internet.
The example for which the code is above would look like this:
Interactive Calendar – jQuery
4. Conclusion
Even though calendars can be easily created and styled in html and css, when it comes to interactivity, you’ll need a more professional level of coding in javascript if you are willing to do it fully customized from scratch.
However feel free to get ready jQuery code to animate things a little bit, while you can have your own html and css.
Note that you might also need to put attributes like value or name to your elements when considering a backend supportive calendar, where information is submitted and needs to be sent somewhere.